Posts

Showing posts from October, 2021

WinAppDriver – Free Tool To Automate Windows Applications

Image
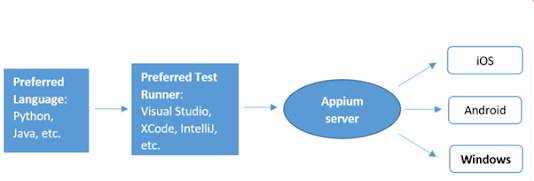
  WinAppDriver WinAppDriver  (short for Windows Application Driver) is a free test automation tool for Windows desktop apps developed by Microsoft. It can run as a standalone as well as a plugin for Appium. Thus, if you are already running Appium’s server, then a request for Win10 app automation will launch WinAppDriver.exe, one of the fast-growing tools that will provide you with better support for using Appium to test Windows apps. Appium is cross-platform it allows you to write tests against multiple platforms (iOS, Android, Windows), using the same API. This enables code reuse between iOS, Android, and Windows test suites Supported Applications  I t is supported on machines running Windows 10 operating system (Home and Pro) and Windows Server 2016 , and it supports all Windows applications based on: Universal Windows Platform (UWP) ,  Windows Forms (WinForms) ,  Windows Presentation Foundation (WPF) , and  Classic Windows (Win32)  apps Configurations Download Windows Applica

Apache Maven Commands and Options

Image
Apache Maven is a software project management and comprehension tool. Based on the concept of a project object model (POM), Maven can manage a project's build, reporting and documentation from a central piece of information Maven Commands Let’s look into some popular and must know maven commands. We will use a sample Maven project to showcase the command output 1. mvn --version  or   mvn -v It will prints out the version of maven you are running 2. mvn clean It will cleans the maven project by deleting the target directory 3. mvn package It will builds the maven project and packages them into a JAR, WAR, etc. Note : The package goal executes compile and test before packaging the build 4. mvn clean package It will clears the target directory and Builds the project and packages the resulting JAR file into the target directory Note : The package goal executes compile and test before packaging the build 5. mvn verify It will runs all integration tests found in the project 6. mvn clean

Import Data Options In Postman

Image
 We can Import data in Postman using the following options Options that are available today in Postman : File Folder Link Raw Text Code Repository Import Button In postman on left top of the corner you have Import button, click on that to import your data to postman   1. File We can directly import files as given in the below formats including JSON format as well, ex-if you have some JSON collection file you can directly import and get as a same collection in your postman   2. Folder       We can import the folder that contains collection JOSN and environment JSON files  it will import as a collection folder in your postman     3. Link   We can import the collection or environment link (you can get it from swagger as well )that you get from anyone and it will import as a collection folder in your postman   4. Raw Text   We can import as raw text as well, like CURL type as a request level 5. Code Repository You must be signed into postman account to use this option, connect to your GitH

Change The Default Port Number Of JSON-Server

Image
In my previous blog we have seen how to create a REST API with JSON Server, if you missed please have a look at here  Link And whenever we start the JSON Server it is running on http://localhost:3000 , mean its running in your localhost and the port number is 3000 , In this blog we will see how to change the port number from 3000 to another port (xxxx) incase something you are running already on 3000 Please refer here how to setup the JSON Server on your machine -  Link Once we are done with the setup and if you want to start the JSON Server in different port then we have to run this command in terminal to start the JSON Server Usually we use this command to start JSON Server which will run the server on 3000 port json-server data.json Start the JSON Server in different port Instead of running the above command we have additionally pass the port parameter value to start in particular port as per your need json-server -p 4000 data.json And now you can open the  URL   in browser or Po

Create A REST API With JSON Server

Image
In the following will learn how to setup JSON Server and publish a sample REST API Most of the time we will not get the flexible dummy REST API end points to practice or learn to validate the CRUD operations, we have an option to create full fake REST API with zero coding Reference Installing JSON Server JSON Server is available as a NPM package, The installation can be done by using the Node.js package manager, since we are going to use NPM packages we required Node.js to be installed before moving further Install Node.js - download the Node.js and install as per your system requirements (Download Node.js here)  and confirm the Node.js is installed successfully on your system as per following the steps shown below  Install JSON Server - We will install JSON Server now using the NPM package, run the below in command prompt    npm install json-server (or) npm install -g json-server **  by adding -g option we make sure the package is installed globally on our system   JSON File - N